jeudi 13 avril 2023

433 Mhz switch command with GPIO with Raspberry Pi 3

Original thread :


Hardware :

Install g++ and Git :

sudo apt-get update
sudo apt-get upgrade
sudo apt-get install gcc g++ make git

Install and compile 433Utils :

git clone --recursive https://github.com/ninjablocks/433Utils.git 
cd 433Utils/RPi_utils 
make all

sudo ./RFSniffer

... Then press the corresponding buttons on the remote control. The code received is then displayed (for me, it is 5510417 for on and 5510420 for off). 
After reading the code, you can also remove the 433Mhz receiver if you mind.

sudo nano control.cpp

Put in it :

#include "../rc-switch/RCSwitch.h"
#include <stdlib.h>
#include <stdio.h>

int main(int argc, char *argv[]) {
int PIN = 0; // cf. wiring Pi pinout
int codeSocketDon = 5510417;
int codeSocketDoff = 5510420;

if (wiringPiSetup() == -1) return 1;

RCSwitch mySwitch = RCSwitch();
mySwitch.enableTransmit(PIN);

if (atoi(argv[1]) == 1) { // you can set your own conditions here
    mySwitch.send(codeSocketDon, 24);
} else {
    mySwitch.send(codeSocketDoff, 24);
}
return 0;
}

Then compile :

g++ -DRPI ../rc-switch/RCSwitch.cpp control.cpp -o control -lwiringPi

Turn ON :

sudo ./control 1

Turn OFF :

sudo ./control 0


samedi 29 octobre 2022

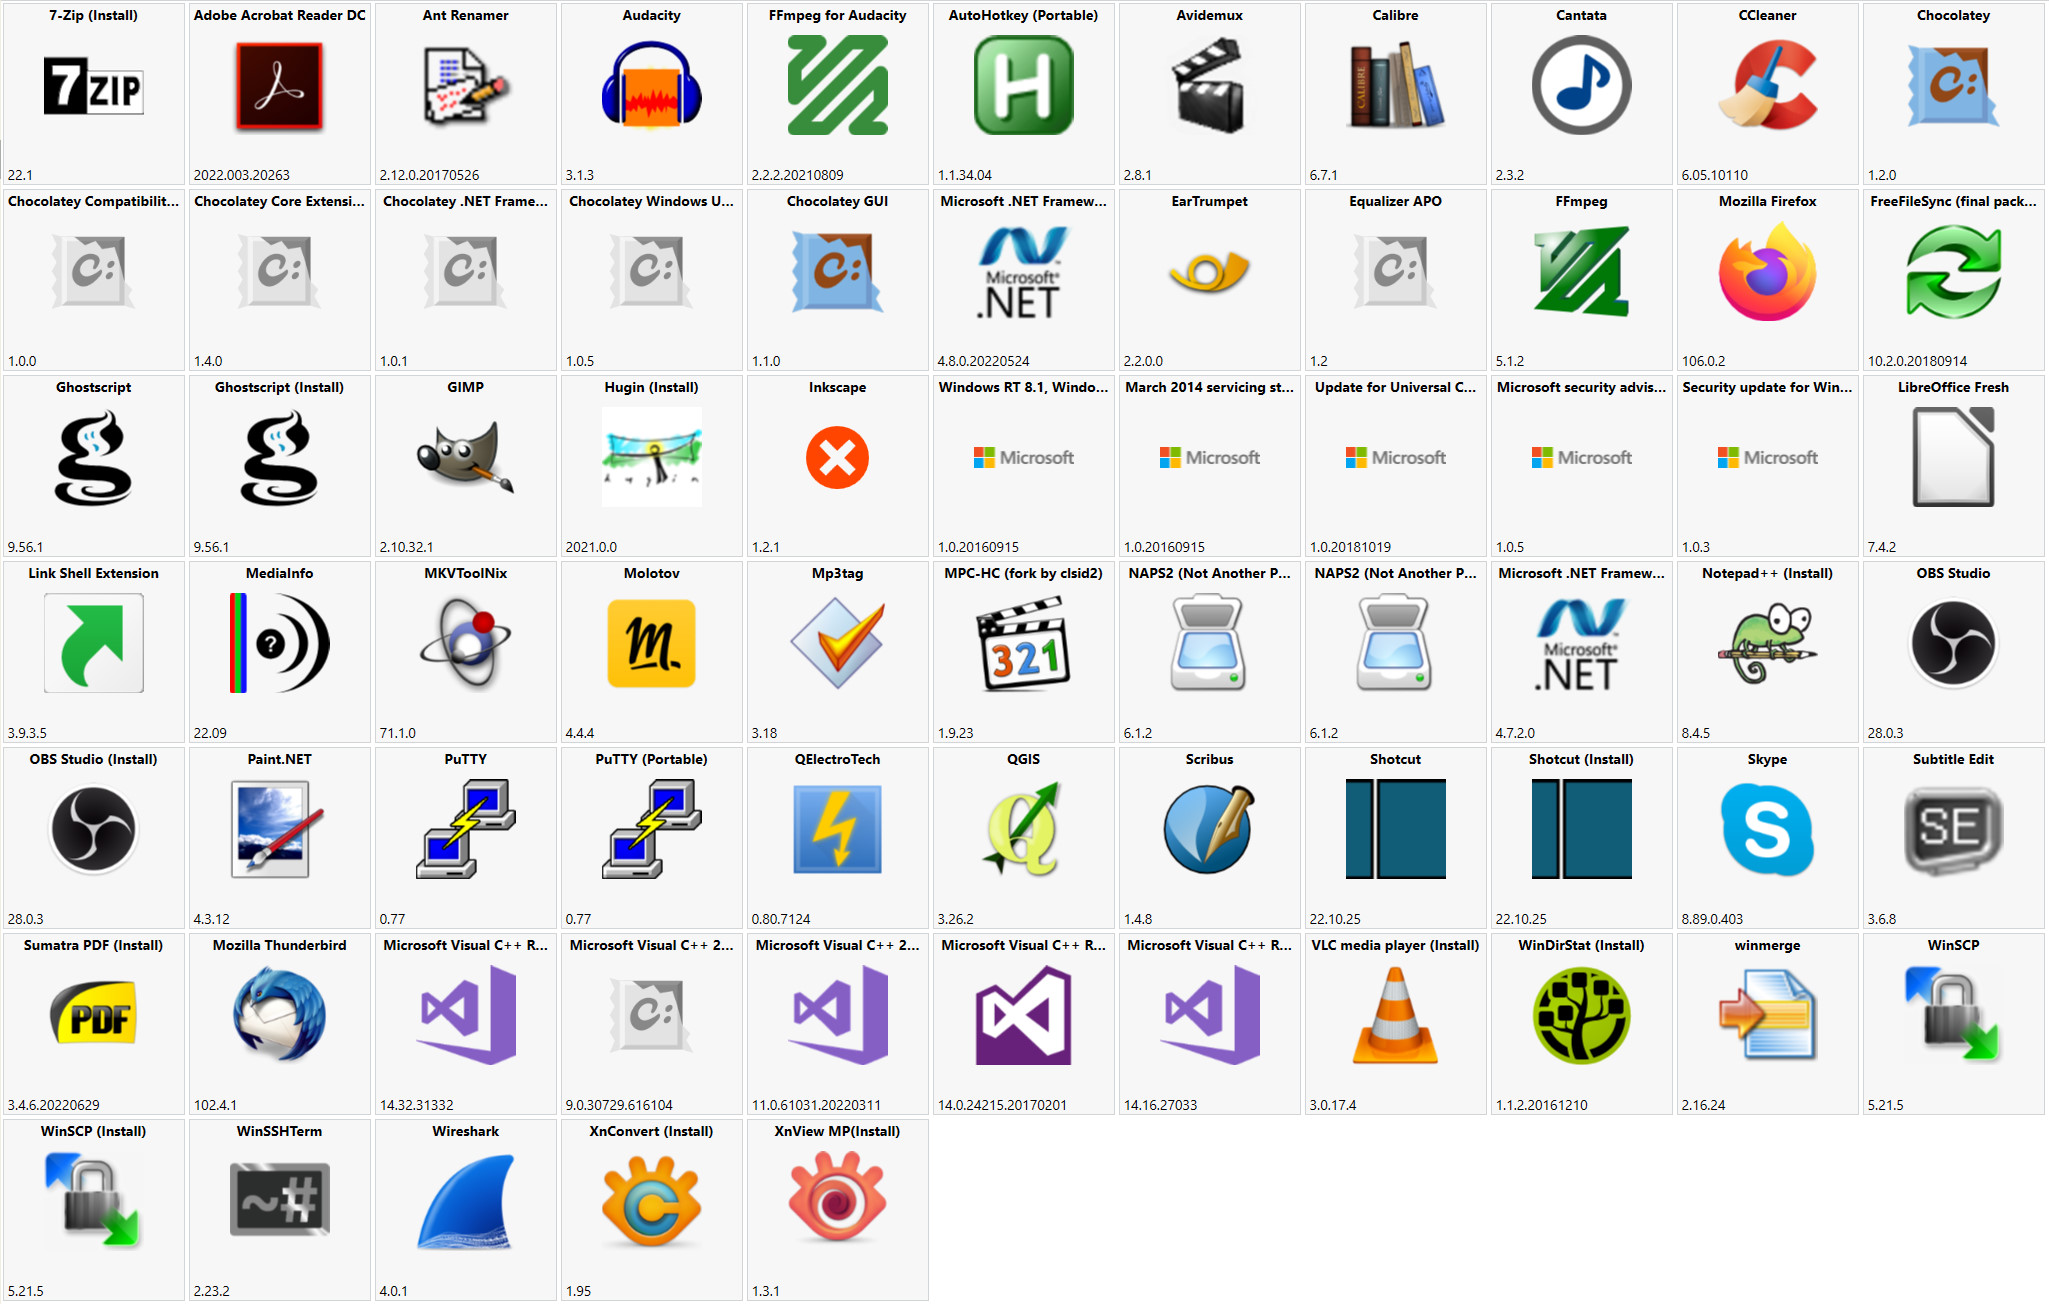
Liste des applications utiles disponibles sur chocolatey


  • 7zip.install
  • adobereader
  • ant-renamer
  • audacity
  • audacity-ffmpeg
  • autohotkey.portable
  • avidemux
  • calibre
  • cantata
  • chocolateygui
  • dotnetfx
  • eartrumpet
  • equalizerapo
  • ffmpeg
  • Firefox
  • freefilesync
  • Ghostscript
  • gimp
  • hugin.install
  • InkScape
  • libreoffice-fresh
  • LinkShellExtension
  • mediainfo
  • mkvtoolnix
  • molotov
  • mp3tag
  • mpc-hc-clsid2
  • naps2.install
  • netfx-4.7.2
  • notepadplusplus.install
  • obs-studio.install
  • paint.net
  • putty
  • qet
  • qgis
  • scribus
  • shotcut.install
  • skype
  • subtitleedit
  • sumatrapdf.install
  • thunderbird
  • vlc.install
  • windirstat
  • winmerge
  • winscp.install
  • winsshterm
  • wireshark
  • xnconvert.install
  • xnviewmp.install


vendredi 21 octobre 2022

Windows explorer addins, plugins, extensions, cusomizations

XnShell

XnShell is a powerful Shell extension for Windows Explorer, allowing you to preview and perform various operations in the Windows ™ context menu.


 https://www.xnview.com/fr/xnshell/

samedi 1 octobre 2022

Add GPS info in Windows explorer columns

 Lauch a power shell console and paste this commands:

$HKLM_FolderTypes = 'HKLM:\Software\Microsoft\Windows\CurrentVersion\Explorer\FolderTypes'
$HKCU_FolderTypes = 'HKCU:\Software\Microsoft\Windows\CurrentVersion\Explorer\FolderTypes'
$PicFolderTypeTV = "$HKCU_FolderTypes\{b3690e58-e961-423b-b687-386ebfd83239}\TopViews\{00000000-0000-0000-0000-000000000000}"
Remove-Item $HKCU_FOlderTYpes -recurse
copy-item $HKLM_FolderTypes "$(split-path $HKCU_FolderTypes)" -Recurse
$TV = (gi (split-path $PicFoldertypeTV)).OpenSubkey($PicFoldertypeTV.split('\')[-1], $true)
$Find = '1System.DateCreated'
$Replace = '1System.GPS.Latitude;1System.GPS.Longitude;1System.GPS.Altitude;1System.DateCreated'
$ColumnList = ($TV.GetValue('ColumnList')).Replace($Find, $Replace)
$ColumnLIst
$TV.SetValue('ColumnList', $ColumnList)
$TV.Close()
get-process explorer | stop-process


Results:


mardi 19 avril 2022

Cleanup EXIF and / or rename images using EXIFTOOL

Rename images (RAW or JPEG) in a directory using EXIF tags
Or
Clean images of unwanted tags while keeping the most important ones


  1. Download, install exiftool
  2. Create a new registry file : RenameRAFJPEGusingEXIF.reg
  3. Edit this file:


Windows Registry Editor Version 5.00
[HKEY_CLASSES_ROOT\Directory\Shell\CleanupExif]
"Icon"="\"C:\\bin\\Images\\exiv2\\exiftool.ico\",0"
@="Cleanup EXIF meta from pictures recursively"
[HKEY_CLASSES_ROOT\Directory\Shell\CleanupExif\command]
@="\"C:\\bin\\Images\\exiv2\\exiftool.exe\" -All= -TagsFromFile @ -DateTimeOriginal -CreateDate -apertureValue -ExposureTime -LensModel -ColorSpace -icc_profile:all -iso -FocalLength -FocalLengthIn35mmFormat -ShutterSpeedValue -model -overwrite_original -L -r -ext jpg -ext jpeg \"%1\""

[HKEY_CLASSES_ROOT\Directory\Shell\RenameRafWithExif]
"Icon"="\"C:\\bin\\Images\\exiv2\\exiftool.ico\",0"
@="Rename RAW pictures recursively"
[HKEY_CLASSES_ROOT\Directory\Shell\RenameRafWithExif\command]
@="\"C:\\bin\\Images\\exiv2\\exiftool.exe\" -q -m \"-filename<${CreateDate;} ISO${ISO;} ${FocalLengthIn35mmFormat;} ${FocalLength;} f${FNumber;} Ts${ExposureTime;} ev${ExposureCompensation;} ${Model;}.%%e\" -ext RAF -ext ARW -ext RAW -ext RW2 -ext DNG \"%1\""

[HKEY_CLASSES_ROOT\Directory\Shell\RenameWithExif]
"Icon"="\"C:\\bin\\Images\\exiv2\\exiftool.ico\",0"
@="Rename JPEG pictures recursively"
[HKEY_CLASSES_ROOT\Directory\Shell\RenameWithExif\command]
@="\"C:\\bin\\Images\\exiv2\\exiftool.exe\" -q -m \"-filename<${CreateDate;} ISO${ISO;} ${FocalLengthIn35mmFormat;} ${FocalLength;} f${FNumber;} Ts${ExposureTime;} ev${ExposureCompensation;} ${Model;}.%%e\" -ext jpg -ext jpeg \"%1\""

Save and execute or import in Windows Registry Editor

Download links:


dimanche 24 octobre 2021

Raspberry Pi to remote control a NAD C325 bee using Lirc

Install lirc :

pi@moode:~ $ sudo apt update

pi@moode:~ $ sudo apt install lirc

Find setting for NAD:

pi@moode:~ $ irdb-get find nad
morgan's_daytona/Tornado.lircd.conf
nad/451.lircd.conf
nad/AVR2.lircd.conf
nad/AVR2.lircd.conf
nad/CDP-5425.lircd.conf
nad/RC512.lircd.conf
nad/SR6.lircd.conf
nad/SR712.lircd.conf


Ok, i choose SR6 (NAD_SR712 seems working also):

pi@moode:~ $ irdb-get download nad/SR6.lircd.conf 

Downloaded https://sourceforge.net/p/lirc-remotes/code/ci/master/tree/remotes/nad/SR6.lircd.conf as SR6.lircd.conf

and copy to etc folder:

pi@moode:~ $ sudo cp SR6.lircd.conf /etc/lirc/lircd.conf.d/

( or downloard lirc remote setting for NAD (325 use SR5 but SR6 seems working..) :

wget http://lirc.sourceforge.net/remotes/nad/SR6

)

Setup GPIO

GPIO 22 is used to transmit remote code by a simple NPN transistor and an IR LED:


Q1 ie.: 2N2222, R1 could be 4K7 and R2 100
IR LED can be salvaged from an old remote control.

Edit /boot/config.txt and add GPIO output line at the end :

pi@moode:~ $ sudo nano /boot/config.txt

dtoverlay=gpio-ir-tx,gpio_pin=22

Setup LIRC

Edit /etc/lirc/lirc_options.conf as follows by changing these two lines:
 
pi@moode:~ $ sudo nano /etc/lirc/lirc_options.conf
 
###driver = devinput
driver = default

Remove suffix .dist from /etc/lirc/lircd.conf.dist
pi@moode:~ $ sudo cp /etc/lirc/lircd.conf.dist /etc/lirc/lircd.conf

Reboot

pi@moode:~ $ sudo reboot

Test by sending code to NAD

First you check your hardware using your smartphone camera, IR codes are visible.

Send 100 times the code KEY_POWER:

pi@moode:~ $ irsend SEND_ONCE NAD_SR6 KEY_POWER -#100
 
You should see the IR LED flashing for 1 or 2 seconde

Turn on the amplifier after booting with a service !

pi@moode:~ $ sudo nano /etc/systemd/system/amplifierOn.service
 
[Unit] 
Description=Set up amplifier 
After=lircd.service 
[Service] 
Type=oneshot 
RemainAfterExit=true 
ExecStart=/usr/bin/irsend SEND_ONCE NAD_SR6 KEY_POWER -#3
ExecStop=/usr/bin/irsend SEND_ONCE NAD_SR6 KEY_SLEEP -#3
[Install] 
WantedBy=multi-user.target

Make this file executable:

pi@moode:~ $ sudo chown root:root /etc/systemd/system/amplifierOn.service
pi@moode:~ $ sudo chmod 666 /etc/systemd/system/amplifierOn.service


Save and test the service:
pi@moode:~ $ sudo systemctl start /etc/systemd/system/amplifierOn.service

Enable the service:

pi@moode:~ $ sudo systemctl enable /etc/systemd/system/amplifierOn.service

If you got an error like : 

Failed to start etc-systemd-system-amplifierOn.service.mount: Unit etc-systemd-system-amplifierOn.service.mount not found.

Just reboot and check service status:

pi@moode:~ $ sudo systemctl status amplifierOn.service 

That should return something like:

● amplifierOn.service - Set up amplifier
   Loaded: loaded (/etc/systemd/system/amplifierOn.service; enabled; vendor preset: enabled)
   Active: active (exited) since Wed 2022-01-26 08:47:39 CET; 6min ago
 Main PID: 482 (code=exited, status=0/SUCCESS)
    Tasks: 0 (limit: 2063)
   CGroup: /system.slice/amplifierOn.service

Jan 26 08:47:39 moode systemd[1]: Starting Set up amplifier...
Jan 26 08:47:39 moode irsend[482]: lirc_command_run: Sending: SEND_ONCE NAD_SR6 KEY_POWER 3
Jan 26 08:47:39 moode irsend[482]: lirc_command_run, state: 0, input: "BEGIN"
Jan 26 08:47:39 moode irsend[482]: lirc_command_run, state: 1, input: "SEND_ONCE NAD_SR6 KEY_POWER 3"
Jan 26 08:47:39 moode irsend[482]: lirc_command_run, state: 2, input: "SUCCESS"
Jan 26 08:47:39 moode irsend[482]: lirc_command_run, state: 3, input: "END"
Jan 26 08:47:39 moode irsend[482]: lirc_command_run: data:END, status:0
Jan 26 08:47:39 moode systemd[1]: Started Set up amplifier. 


Which indicates that everything is working normally... if not... good luck !

mardi 7 septembre 2021

G'MIC : un outil pour travailler le pixel

 G'MIC est un logiciel de traitement et de génération d'images

Il existe sous la forme de plugin pour Gimp et Paint.net entre autres et sous la forme d'application pour Linux ou Windows avec interface ou en ligne de commandes.

La galerie d'exemples donnes un petit aperçu des capacité du programme


Exemple de ligne de commandes:

gmic input "DSCF2976.jpg" fx_animate_pencilbw 10,1,0,out,1,20,0,200 fx_animate_pencilbw 10,1,0,out,0,200,1,20 -o "a.png"
 
Suivie d'une mise en vidéo:
ffmpeg -r 1 -i a_000%03d.png -c:v hevc_nvenc -rc vbr -cq 24 -qmin 18 -qmax 22 -profile:v main10 -pix_fmt p010le -b:v 0K -c:a aac -map 0 out3.mp4


mercredi 2 juin 2021

Outils complémentaires pour la gestion du son sous Windows 10.

Equalizer APO 1.2.1

Ce logiciel vous permet d'appliquer des filtres tel que gain, passe-haut, bas, égaliseur graphique (dont les paramètres peuvent être importés et exportés au format texte) etc.. sur chaque sorties ou entrées et de manière indépendante.

Ces paramètres seront ainsi appliqués à tous les logiciels utilisés, votre lecteur audio (foobar2000 en ce qui me concerne) votre lecteur vidéo (pour moi: VLC) ou votre navigateur.

Vous pourrez aussi appliquer des filtres spécifiques pour votre casque et aussi sur son microphone ou votre webcam.

Vous obtiendrez ainsi le meilleurs son adapté à vos enceintes acoustique ou à votre casque gamer...


EarTrumpet

Cet utilitaire ajuste le volume de chaque logiciel indépendamment, fini les écarts de volume entre Skype, Firefox ou vos jeux.

Après l'installation, dans les paramètres activé l’icône EarTrumpet 


Le menu ci-dessous est accessible depuis l'icône situé dans la zone de notification:


NirCmd 

Nircmd n'est pas à proprement parlé un outil audio mais je l'utilise pour basculer d'une sortie à l'autre, par exemple pour définir le périphérique de sortie par défaut et ainsi choisir d'envoyer le son vers le casque ou les haut-parleurs.
 
Il faut créer deux raccourcies sur le bureau un pour les haut-parleurs et un pour le casque.

Raccourcie pour les haut-parleurs:

Ligne de commande :
 C:\bin\System\nirsoft\NirSoft\nircmd.exe setdefaultsounddevice Haut-Parleur

où :
"C:\bin\System\nirsoft\NirSoft\nircmd.exe" est le chemin vers l'utilitaire nircmd

"setdefaultsounddevice" est la commande nircmd utilisée
 
"Haut-Parleur" est le nom du périphérique que l'on retrouve dans les paramètre de son de Windows.
 

 Puis un autre raccourcie pour le casque :

 C:\bin\System\nirsoft\NirSoft\nircmd.exe setdefaultsounddevice Casque


Pour obtenir le nom de chaque périphérique de sortie:

Clic droit sur l’icône   haut-parleur de la zone de notification:
 
Cliquer sur "Gérer les périphériques audio"
 
Le nom des périphériques de sortie sont listés ( ici Haut-Parleur et Casque), ces nom peuvent être redéfinis en veillant à le pas mettre d'espace dans ces noms.


dimanche 20 décembre 2020

Build mpd (Music Player Daemon) on a Raspberry Pi


apt install meson g++ libpcre3-dev libmad0-dev libmpg123-dev libid3tag0-dev libflac-dev libvorbis-dev libopus-dev libogg-dev libadplug-dev libaudiofile-dev libsndfile1-dev libfaad-dev libfluidsynth-dev libgme-dev libmikmod-dev libmodplug-dev libmpcdec-dev libwavpack-dev libwildmidi-dev libsidplay2-dev libsidutils-dev libresid-builder-dev libavcodec-dev libavformat-dev libmp3lame-dev libtwolame-dev libshine-dev libsamplerate0-dev libsoxr-dev libbz2-dev libcdio-paranoia-dev libiso9660-dev libmms-dev libzzip-dev libcurl4-gnutls-dev libyajl-dev libexpat-dev libasound2-dev libao-dev libjack-jackd2-dev libopenal-dev libpulse-dev libshout3-dev libsndio-dev libmpdclient-dev libnfs-dev libupnp-dev libavahi-client-dev libsqlite3-dev libsystemd-dev libgtest-dev libboost-dev libicu-dev libchromaprint-dev libgcrypt20-dev

git pull --rebase git://github.com/MusicPlayerDaemon/MPD master
cd MPD
git pull --rebase git://github.com/MusicPlayerDaemon/MPD master
meson . output/release --buildtype=debugoptimized -Db_ndebug=true
meson configure output/release
ninja -C output/release
sudo ninja -C output/release install


mercredi 16 décembre 2020

Un peu de ffmpeg

Créer une vidéo avec une liste d'images/photos :

Sous Linux:

cat *.jpg | ffmpeg -f image2pipe -r 1 -vcodec mjpeg -i - -vcodec libx264 out.mp4


Sous Windows:

ffmpeg -r 1/5 -i gmic_pencilbw_000000_000%03d.png -c:v libx264 -vf fps=25 -pix_fmt yuv420p out.mp4


Créer l'image du spectre audio d'un fichier audio ou vidéo:

ffmpeg -y -i tets.mp3 -lavfi showspectrumpic=s=1200x600:fscale=log:color=rainbow spectrum.png


Encodage NVIDIA:

ffmpeg -i "e:\input.ts" -vcodec h264_nvenc -preset slow -level 4.1 -qmin 18 -qmax 22 "e:\output.mp4"

Ou bien :

ffmpeg -loglevel debug -threads 4 -hwaccel cuvid -c:v mpeg2_cuvid -i "e:\input.ts" \
-filter:v scale_npp=w=1920:h=1080:format=yuv420p:interp_algo=lanczos \
-c:v h264_nvenc -preset:v llhq -profile:v main -level:v 4.1 -rc:v ll_2pass_quality -rc-lookahead:v 32 -temporal-aq:v 1 -weighted_pred:v 1 -coder:v cabac \
-f mp4 "e:\output.mp4" 
 

lundi 7 décembre 2020

Windows 10 : Utilisation simultané d'une connexion Ethernet pour le LAN et d'une connexion 4G ou autre pour le WAN

 Suite à une panne de box, j'ai eu recours à mon téléphone portable pour utiliser Internet.

J'ai autorisé le partage par USB sur mon téléphone, connecté celui-ci au PC, mais ça ne fonctionné pas car ma connexion Ethernet été toujours active, si je désactivais cette connexion Ethernet, l'accès à Internet était possible mais alors plus d'accès au réseau local (NAS, etc... )

La solution trouvé ici (et ailleurs) : connexion simultanée wifi et ethernet win10 (pcastuces.com)

Panneau de config -> Centre Réseau et partage -> sur la gauche Modifier les param de carte

  1. Clic droit sur la carte a faire passer en priorité haute (Ethernet) -> Propriétés
  2. Sélectionnez Protocole Internet version 4 -> propriétés
  3. Bouton « Avancé… » tout en bas
  4. Décochez ensuite Métrique automatique et entrez une métrique de l’interface a 1
  5. Répétez ces étapes pour l'interfaces 4G (ou freewifi) mettant 2 en métrique sachant que plus la métrique est haute moins la carte est prioritaire

Par exemple: Connexion 4G en "10" et connexion Ethernet en "20"

Maintenant il est possible accéder au deux réseaux !


mardi 22 septembre 2020

 MPD et les streams Radio France

J'utilise MPD sur un raspberry conjointement avec l'interface web mympd.
J'écoute principalement des streams de Radio France en haute qualité (AAC 192 kbs) et depuis quelques semaines et le matin seulement je constate des coupures du son voir l'abandon par MPD du stream qui passe au suivant de la playlist.

J'ai corrigé ce problème en remplacent le plugin d'entrée curl par ffmpeg
J'ai modifier le plugin d'entrée:
input {
        plugin "ffmpeg"
}
 
#input {
#        plugin "curl"
#}
... et ça ne résou rien :(
 
J'ai regardé les paquets TCP échangés. 
J'ai remarqué que le dns renvoyé plusieurs adresses IP pour le serveur radiofrance:
Première essai de connexion: 
Domain Name System (response)
Transaction ID: 0xbeed
Flags: 0x8180 Standard query response, No error
Questions: 1
Answer RRs: 7
Authority RRs: 0
Additional RRs: 0
Queries
Answers
icecast.radiofrance.fr: type CNAME, class IN, cname icecasta.prods1public.radiofrance.fr
icecasta.prods1public.radiofrance.fr: type A, class IN, addr 163.172.182.190
icecasta.prods1public.radiofrance.fr: type A, class IN, addr 51.158.65.164
icecasta.prods1public.radiofrance.fr: type A, class IN, addr 212.47.251.152
icecasta.prods1public.radiofrance.fr: type A, class IN, addr 51.158.117.244
icecasta.prods1public.radiofrance.fr: type A, class IN, addr 51.158.104.58
icecasta.prods1public.radiofrance.fr: type A, class IN, addr 163.172.145.72
[Request In: 1]
[Time: 0.027922000 seconds]

le player utilise la dernière proposée:
-> icecasta.prods1public.radiofrance.fr: type A, class IN, addr 163.172.145.72

Deuxième essai de connexion:
Domain Name System (response)
Transaction ID: 0x101d
Flags: 0x8180 Standard query response, No error
Questions: 1
Answer RRs: 7
Authority RRs: 0
Additional RRs: 0
Queries
Answers
icecast.radiofrance.fr: type CNAME, class IN, cname icecasta.prods1public.radiofrance.fr
icecasta.prods1public.radiofrance.fr: type A, class IN, addr 163.172.182.190
icecasta.prods1public.radiofrance.fr: type A, class IN, addr 51.158.117.244
icecasta.prods1public.radiofrance.fr: type A, class IN, addr 51.158.104.58
icecasta.prods1public.radiofrance.fr: type A, class IN, addr 163.172.145.72
icecasta.prods1public.radiofrance.fr: type A, class IN, addr 51.158.65.164
icecasta.prods1public.radiofrance.fr: type A, class IN, addr 212.47.251.152
[Request In: 1]
[Time: 0.026924000 seconds]


le player utilise la dernière proposée:
 -> icecasta.prods1public.radiofrance.fr: type A, class IN, addr 212.47.251.152 
 
Je pense que le player web du site radiofrance "jongle" avec ces adresses pour utiliser le serveur le plus disponible au lieu de prendre le dernier..
Un coup d'oeil sur les paquets échangés lors de l'utilisation du player web, montre des échanges bien plus complexes.
Le player fini par utiliser 2.21.132.169 comme serveur de stream, soit : a2-21-132-169.deploy.static.akamaitechnologies.com  ...


jeudi 10 septembre 2020

Music Player Daemon build on Raspberry Pi

Build MPD from sources on Raspberry Pi 

Original post here:

Get the sources:

git clone https://github.com/MusicPlayerDaemon/MPD.git 
cd MPD 

Get all necessary dependencies

sudo apt-get install g++ \
  libpcre3-dev \
  libmad0-dev libmpg123-dev libid3tag0-dev \
  libflac-dev libvorbis-dev libopus-dev \
  libadplug-dev libaudiofile-dev libsndfile1-dev libfaad-dev \
  libfluidsynth-dev libgme-dev libmikmod2-dev libmodplug-dev \
  libmpcdec-dev libwavpack-dev libwildmidi-dev \
  libsidplay2-dev libsidutils-dev libresid-builder-dev \
  libavcodec-dev libavformat-dev \
  libmp3lame-dev libtwolame-dev libshine-dev \
  libsamplerate0-dev libsoxr-dev \
  libbz2-dev libcdio-paranoia-dev libiso9660-dev libmms-dev \
  libzzip-dev \
  libcurl4-gnutls-dev libyajl-dev libexpat-dev \
  libasound2-dev libao-dev libjack-jackd2-dev libopenal-dev \
  libpulse-dev libshout3-dev \
  libsndio-dev \
  libmpdclient-dev \
  libnfs-dev libsmbclient-dev \
  libupnp-dev \
  libavahi-client-dev \
  libsqlite3-dev \
  libsystemd-dev libwrap0-dev \
  libgtest-dev \
  libboost-dev \
  libicu-dev \
  libgcrypt-dev \
  libsidplayfp-dev

Install messon and ninja tools:

sudo apt-get install python3 python3-pip ninja-build
sudo pip3 install meson 

Stop mpd service:

sudo service mpd stop 

Compile mpd:

meson . output/release --buildtype=debugoptimized -Db_ndebug=true
meson configure output/release
ninja -C output/release
sudo ninja -C output/release install  
  • mpd is in ./output/release
  • service files are ./output/release/systemd
  • use the mpdconf.example in ./doc for configuration

Workarrounds and errors:

mpd binary is located in /usr/local/bin and this mpd binary try to open mpd.conf located in /usr/local/etc NOT in usual folder /etc

So, you have to link these file and folder:

sudo mv /usr/bin/mpd /usr/bin/mpd_old
sudo ln -s /usr/local/bin/mpd /usr/bin/mpd

Check if folder /usr/local/etc already exists:

ls /usr/local

If an etc folder exists, rename it to etc_bak

sudo mv /usr/local/etc /usr/local/etc_old

Link etc folder:

sudo ln -s /etc /usr/local

move old etc files to linked folder:

sudo mv /usr/local/etc_old/* /usr/local/etc

dimanche 12 janvier 2020

Repairing Domoticz database...

Some error appearing in domoticz log concerning VACUUM:

2020-01-12 15:00:01.363 Error: SQL Query("VACUUM") : database disk image is malformed

First, stop domoticz:

$ sudo service domoticz.sh stop

Backup the database:

$ cp ./domoticz/domoticz.db ./domoticz/domoticz.db.bak

Method 1

$ sqlite3 ./domoticz/domoticz.db
sqlite> .output domo.sql 
sqlite> .dump
sqlite> .quit

Download domo.sql to your Windows PC,

Try to import domo.sql in Sqlite Browser ( https://sqlitebrowser.org/ ) ,
Note error messages if exists and cleanup manualy ( notepad++ ) domo.sql (duplicate inserts, etc...) until importation success.

When sql is successfully imported, save to "domoticz.db"
Upload to domoticz machine, 

$ rm ./domoticz/domoticz.db
$ cp ./domoticz.db ./domoticz/domoticz.db
$ sudo service domoticz.sh start

If no success then :
$ rm ./domoticz/domoticz.db
$ cp ./domoticz/domoticz.db.bak ./domoticz/domoticz.db

Method 2 (not worked for me)

Open database with sqlite3:

$ sqlite3 ./domoticz/domoticz.db

Check integrity:

sqlite> PRAGMA integrity_check;
*** in database main ***
On tree page 138 cell 50: Rowid 2287 out of order
row 252 missing from index ds_hduts_idx
wrong # of entries in index ds_hduts_idx
...

First reindex DeviceStatus:

sqlite> reindex ds_hduts_idx;

Check integrity again:

sqlite> PRAGMA integrity_check;
*** in database main ***
On tree page 138 cell 50: Rowid 2287 out of order

... Error: database disk image is malformed

Build a clean copy of database:

sqlite> .clone domoticz-clone.sqlite

DeviceStatus... done
LightingLog... done
SceneLog... done
Preferences... done
Rain... done
Rain_Calendar... done
Temperature... done
Temperature_Calendar... done
Timers... done
SetpointTimers... done
UV... done
UV_Calendar... done
Wind... done
Wind_Calendar... done
Meter... done
Meter_Calendar... done
MultiMeter... done
MultiMeter_Calendar... done
Notifications... done
Hardware... done
Users... done
LightSubDevices... done
Cameras... done
CamerasActiveDevices... done
DeviceToPlansMap... done
Plans... done
Scenes... done
SceneDevices... done
TimerPlans... done
SceneTimers... done
SharedDevices... done
EventMaster... done
EventRules... done
ZWaveNodes... done
WOLNodes... done
Percentage... done
Percentage_Calendar... done
Fan... done
Fan_Calendar... done
BackupLog... done
EnoceanSensors... done
FibaroLink... done
HttpLink... done
PushLink... done
GooglePubSubLink... done
UserVariables... done
Floorplans... done
CustomImages... done
MySensors... done
MySensorsVars... done
MySensorsChilds... done
ToonDevices... done
UserSessions... done
MobileDevices... done
sqlite_stat1... Error: object name reserved for internal use: sqlite_stat1
SQL: [CREATE TABLE sqlite_stat1(tbl,idx,stat)]
Error 1: no such table: sqlite_stat1 on [SELECT * FROM "sqlite_stat1"]
done
sqlite_autoindex_UserSessions_1... done
sqlite_autoindex_UserSessions_2... done
ds_hduts_idx... done
f_id_idx... done
f_id_date_idx... done
fc_id_idx... done
fc_id_date_idx... done
ll_id_idx... done
ll_id_date_idx... done
sl_id_idx... done
sl_id_date_idx... done
m_id_idx... done
m_id_date_idx... done
mc_id_idx... done
mc_id_date_idx... done
mm_id_idx... done
mm_id_date_idx... done
mmc_id_idx... done
mmc_id_date_idx... done
p_id_idx... done
p_id_date_idx... done
pc_id_idx... done
pc_id_date_idx... done
r_id_idx... done
r_id_date_idx... done
rc_id_idx... done
rc_id_date_idx... done
t_id_idx... done
t_id_date_idx... done
tc_id_idx... done
tc_id_date_idx... done
u_id_idx... done
u_id_date_idx... done
uv_id_idx... done
uv_id_date_idx... done
w_id_idx... done
w_id_date_idx... done
wc_id_idx... done
wc_id_date_idx... done
devicestatusupdate... done
deviceplantatusupdate... done
planordertrigger... done
scenesupdate... done
scenedevicesupdate... done
floorplanordertrigger... done
...
sqlite> PRAGMA user_version;
0  <----- TAKE NOTE OF THIS VALUE it may be different for you
sqlite> .exit

Open the database copy and correct:

$ sqlite3 domoticz-clone.sqlite
sqlite> PRAGMA integrity_check;
ok
sqlite> PRAGMA user_version = 0;  -- use the number you got from PRAGMA user_version; above
sqlite> PRAGMA journal_mode = truncate;
truncate
sqlite> PRAGMA page_size = 32768;
sqlite> VACUUM;
sqlite> PRAGMA journal_mode = wal;
wal
sqlite> .exit

Copy new cleaned database on domoticz database:

$ mv domoticz-clone.sqlite ./domoticz/domoticz.db

Finally start domoticz service:

$ sudo service domoticz.sh start

You can now check domoticz log with web ui...

dimanche 22 décembre 2019

cron.minutely, cron.daily, etc...

L'utilisation de cron.daily ou autre pour programmer des tâches à exécuter n'est pas trivial:

Il faut placer le scripte SANS EXTENSION dans le dossier concerné et son nom ne doit comporter que des lettres, chiffres, signe - ou _

Genre : "monScript"

Il faut lui donner le droit d'exécution : sudo chmod +x monScript

Pour savoir si le scripte sera prit en compte on exécute la commande :

sudo run-parts --test /etc/cron.daily/

Le scripte doit apparaitre dans la liste : 

/etc/cron.daily/apt-compat
/etc/cron.daily/apt-show-versions
/etc/cron.daily/dietpi
/etc/cron.daily/dpkg
/etc/cron.daily/lighttpd

/etc/cron.daily/monScript
/etc/cron.daily/passwd

Avec Dietpi, un utilitaire permet de définir précisément quand la tâche sera lancée, par exemple à la troisième seconde de chaque minute pour minutely, ou à 1h23 pour daily


vendredi 20 décembre 2019

domoticz letsencrypt certbot auto renew

Install certificat :

cd ~
mkdir certbot
cd certbot/
wget https://dl.eff.org/certbot-auto
sudo chown root ./certbot-auto
sudo chmod 0755 ./certbot-auto
sudo ./certbot-auto certonly --standalone -d w4v3.com
lsa ~/domoticz/
sudo rm ~/domoticz/server_cert.pem
sudo cat /etc/letsencrypt/live/YOURDOMAIN.COM/privkey.pem >> ~/domoticz/server_cert.pem
sudo cat /etc/letsencrypt/live/YOURDOMAIN.COM/fullchain.pem >> ~/domoticz/server_cert.pem
sudo cp ~/domoticz/server_cert.pem ~/domoticz/domo_server_cert.pem
cd ..
cd domoticz/
sudo /etc/init.d/domoticz.sh restart


Wait 20s then check your server status using a browser : https://www.digicert.com/help/

Auto renew now :

cd ..
cd certbot/
nano cert-domoticz-update.sh

#!/bin/bash
/home/pi/certbot/certbot-auto renew
rm /home/pi/domoticz/server_cert.pem
rm /home/pi/domoticz/domo_server_cert.pem
cat /etc/letsencrypt/live/YOURDOMAIN.COM/privkey.pem >> /home/pi/domoticz/domo_server_cert.pem
cat /etc/letsencrypt/live/YOURDOMAIN.COM/fullchain.pem >> /home/pi/domoticz/domo_server_cert.pem
cp /home/pi/domoticz/domo_server_cert.pem /home/pi/domoticz/server_cert.pem
/etc/init.d/domoticz.sh restart


I use dietpi so home is /home/dietpi instead of /home/pi

Use Cron to renew certificat every day :

sudo chown root certDomoticzUpdate.sh
sudo chmod 0755 certDomoticzUpdate.sh


Place the script without extension in /etc/cron.daily

sudo cp /home/pi/certDomoticzUpdate.sh /etc/cron.daily/certDomoticzUpdate

Then verify cron status:

sudo run-parts --test /etc/cron.daily/


Scripte must appears in list


/etc/cron.daily/apt-compat
/etc/cron.daily/apt-show-versions
/etc/cron.daily/dietpi
/etc/cron.daily/dpkg
/etc/cron.daily/lighttpd
/etc/cron.daily/certDomoticzUpdate
/etc/cron.daily/passwd

mardi 3 décembre 2019

myMPD une branche de ympd le client web léger pour music player deamon

myMPD : https://github.com/jcorporation/myMPD

Pré-requis:

sudo apt update
sudo apt upgrade
sudo apt install mediainfo
sudo apt install libmpdclient-dev

Téléchragement des sources:

git clone https://github.com/jcorporation/myMPD.git

Construction du binaire:

cd myMPD/
sudo ./build.sh releaseinstall

Edition du fichier de configuration:

sudo nano /etc/mympd.conf

Essais:

sudo service mympd start
sudo service mympd stop

Ajustement du fichier de configuration:

sudo nano /etc/mympd.conf

Installation du service au démarrage:

sudo systemctl enable mympd

Démarrage manuel:

sudo service mympd start

samedi 12 octobre 2019

Un serveur de marée (?)

Un ingénieux développeur ( https://github.com/joelkoz ) a mis en ligne le code d'un serveur web de données json et graphique de marées basé sur le célèbre xtide, fameux et historique logiciel de calcul des marées : https://github.com/joelkoz/xtwsd

Ce serveur web renvoi des horaires de marée, des graphes et autres coefficients harmoniques

Ma seule contribution est cette méthode de mise en œuvre ainsi que l'ajout des coefficients harmoniques pour Arcachon, mais attention les résultats pour ce port sont expérimentaux et d'ailleurs incorrect, à peaufiner donc.

Si vous disposez de meilleurs coefficients harmoniques pour Arcachon et autres, je suis preneur !

Installation : 

La quincaillerie:
pi@dietpi:~/wtide$ sudo apt install git cmake gcc g++ bzip2 ragel libpng-dev libssl-dev
..
..
..

La librairie boost:
pi@dietpi:~/wtide$ wget https://dl.bintray.com/boostorg/release/1.71.0/source/boost_1_71_0.tar.bz2
pi@dietpi:~/wtide$ tar --bzip2 -xf boost_1_71_0.tar.bz2
pi@dietpi:~/wtide$ cd boost_1_71_0
pi@dietpi:~/wtide/boost_1_71_0$ ./bootstrap.sh -with-libraries=system
pi@dietpi:~/wtide/boost_1_71_0$ sudo ./b2 install
..
..
...updated 15188 targets...


La librairie TCD:
pi@dietpi:~/wtide/boost_1_71_0$ cd ..
pi@dietpi:~/wtide$ wget https://flaterco.com/files/xtide/libtcd-2.2.7-r2.tar.bz2
pi@dietpi:~/wtide$ tar --bzip2 -xf libtcd-2.2.7-r2.tar.bz2
pi@dietpi:~/wtide$ cd libtcd-2.2.7
pi@dietpi:~/wtide/libtcd-2.2.7$ ./configure
pi@dietpi:~/wtide/libtcd-2.2.7$ make
pi@dietpi:~/wtide/libtcd-2.2.7$ sudo make install
pi@dietpi:~/wtide/libtcd-2.2.7$ cd ..

Le serveur:
pi@dietpi:~/wtide$ git clone --recursive https://github.com/joelkoz/xtwsd.git
pi@dietpi:~/wtide$ mkdir xtwsd/build
pi@dietpi:~/wtide$ cd xtwsd/build
pi@dietpi:~/wtide/xtwsd/build$ cmake -Wno-dev ..
pi@dietpi:~/wtide$ cd xtwsd/
pi@dietpi:~/wtide/xtwsd$ ls
pi@dietpi:~/wtide/xtwsd$ cd build
pi@dietpi:~/wtide/xtwsd/build$ make
..
..
..
zzzzzz..rrr
..
pi@dietpi:~/wtide/xtwsd/build$ sudo make install

Le fichier d'harmoniques:
pi@dietpi:~/wtide/xtwsd/build$ cd /usr/local/share/
pi@dietpi:/usr/local/share$ sudo mkdir xtide
pi@dietpi:/usr/local/share$ cd xtide
pi@dietpi:/usr/local/share/xtide$ sudo wget https://flaterco.com/files/xtide/harmonics-dwf-20190620-free.tar.bz2
pi@dietpi:/usr/local/share/xtide$ sudo tar --bzip2 -xf harmonics-dwf-20190620-free.tar.bz2
pi@dietpi:/usr/local/share/xtide$ sudo rm harmonics-dwf-20190620-free.tar.bz2
pi@dietpi:/usr/local/share/xtide$ sudo cp harmonics-dwf-20190620/harmonics-dwf-20190620-free.tcd harmonics.tcd
pi@dietpi:/usr/local/share/xtide$ sudo rm -R harmonics-dwf-20190620/
pi@dietpi:/usr/local/share/xtide$ export HFILE_PATH=/usr/local/share/xtide/harmonics.tcd
pi@dietpi:~/wtide/xtwsd/build$ sudo nano /etc/xtide.conf

    /usr/local/share/xtide/harmonics.tcd
   

Test #1:
pi@dietpi:/usr/local/share/xtide$ cd /home/pi/xtwsd/build
pi@dietpi:~/wtide/xtwsd/build$ sudo ./xtwsd 800
xtwsd v0.2
Starting web service on port 800
^C

Test #2 dans un screen:
pi@dietpi:~/wtide/xtwsd/build$ screen -S server
pi@dietpi:~/wtide/xtwsd/build$ sudo ./xtwsd 800

^a d


Ajoutons les ports des Caraïbes:

pi@dietpi:~/wtide/xtwsd/build$ ./nos2xt -f ../src/util/caribbean.txt -p 800

Building context map...Indexing /usr/local/share/xtide/harmonics.tcd...
Done.
Building context map...Done.
..
..
..
Building context map...Done.

Ajoutons Arcachon Eyrac (au hazard)
pi@dietpi:~/wtide/xtwsd/build$ nano eyrac-full.json


{
"comments": "",
"country": "France",
"harmonics": {
"confidence": 10,
"constituents": [
{
"name": "M2",
"amp": 1.339,
"epoch": 147.0
},
{
"name": "S2",
"amp": 0.443,
"epoch": 188.0
},
{
"name": "N2",
"amp": 0.261,
"epoch": 130.0
},
{
"name": "K1",
"amp": 0.045,
"epoch": 100.0
},
{
"name": "O1",
"amp": 0.069,
"epoch": 350.0
},
{
"name": "NU2",
"amp": 0.0492,
"epoch": 130.0
},
{
"name": "MU2",
"amp": 0.0414,
"epoch": 130.0
},
{
"name": "2N2",
"amp": 0.0343,
"epoch": 130.0
},
{
"name": "OO1",
"amp": 0.003,
"epoch": 100
},
{
"name": "LAM2",
"amp": 0.0094,
"epoch": 188
},
{
"name": "M1",
"amp": 0.0049,
"epoch": 100.0
},
{
"name": "J1",
"amp": 0.0055,
"epoch": 100.0
},
{
"name": "MM",
"amp": 0.0,
"epoch": 0.0
},
{
"name": "SSA",
"amp": 0.0,
"epoch": 0.0
},
{
"name": "SA",
"amp": 0.011,
"epoch": 182.0
},
{
"name": "MF",
"amp": 0.0,
"epoch": 0.0
},
{
"name": "RHO",
"amp": 0.0026,
"epoch": 100.0
},
{
"name": "Q1",
"amp": 0.0150,
"epoch": 304.0
},
{
"name": "T2",
"amp": 0.0261,
"epoch": 188
},
{
"name": "R2",
"amp": 0.0035,
"epoch": 188.00
},
{
"name": "2Q1",
"amp": 0.0018,
"epoch": 100
},
{
"name": "P1",
"amp": 0.015,
"epoch": 100.0
},
{
"name": "L2",
"amp": 0.0383,
"epoch": 147
},
{
"name": "K2",
"amp": 0.1197,
"epoch": 188
},
{
"name": "M3",
"amp": 0.0,
"epoch": 0
},
{
"name": "M4",
"amp": 0.091,
"epoch": 93
},
{
"name": "M6",
"amp": 0.0,
"epoch": 0
},
{
"name": "M8",
"amp": 0.0,
"epoch": 0
},
{
"name": "S1",
"amp": 0.0,
"epoch": 0
},
{
"name": "S4",
"amp": 0.0,
"epoch": 0
},
{
"name": "S6",
"amp": 0.0,
"epoch": 0
},
{
"name": "MK3",
"amp": 0.0,
"epoch": 0
},
{
"name": "2MK3",
"amp": 0.0,
"epoch": 0
},
{
"name": "MN4",
"amp": 0.028,
"epoch": 72.0
},
{
"name": "2SM2",
"amp": 0.0,
"epoch": 0
},
{
"name": "MSF",
"amp": 0.0,
"epoch": 0
},
{
"name": "MS4",
"amp": 0.0500,
"epoch": 159
}
],
"datum": "Mean Lower Low Water",
"datumOffset": 0,
"zoneOffset": 0
},
"levelUnits": "meters",
"name": "Arcachon Eyrac",
"notes": "",
"position": {
"lat": 44.665076,
"long": -1.163666
},
"referenceStation": true,
"source": {
"context": "SHOM",
"name": "xtwsd",
"stationId": "1"
},
"timezone": ":Europe/Paris",
"type": "tide"
}

pi@dietpi:~/wtide/xtwsd/build$ curl -vX POST http://127.0.0.1:800/harmonics -d @eyrac-full.json --header "Content-Type: application/json"

Test #3:
On récupère la marée(?) pour Arcachon:
Dans un navigateur:
http://192.168.1.3:800/location/SHOM:1?start=2019-10-12%2000:00%20am%20EDT&local=1&detailed=1

ou 192.168.1.3 est l'adresse du Pi.. On obtient quelque chose comme ça:

{"index":214,"id":"SHOM:1","name":"Arcachon Eyrac","position":{"lat":44.665076,"long":-1.163666},"timezone":":Europe/Paris","note":"","type":"tide","levelUnits":"m","events":[{"time":"2019-10-12 12:13 AM CEST","name":"Low Tide","isMaxMin":true,"level":-1.4912528607527973},{"time":"2019-10-12 06:29 AM CEST","name":"High Tide","isMaxMin":true,"level":1.3308788824466118},{"time":"2019-10-12 06:31 AM CEST","name":"Moonset","isMaxMin":false},{"time":"2019-10-12 08:15 AM CEST","name":"Sunrise","isMaxMin":false},{"time":"2019-10-12 12:26 PM CEST","name":"Low Tide","isMaxMin":true,"level":-1.5278729066763577},{"time":"2019-10-12 06:43 PM CEST","name":"High Tide","isMaxMin":true,"level":1.5119263360270265},{"time":"2019-10-12 07:20 PM CEST","name":"Moonrise","isMaxMin":false},{"time":"2019-10-12 07:26 PM CEST","name":"Sunset","isMaxMin":false}]}


Un beau graphe:
http://192.168.1.3:800//graph/SHOM:1?local=1&detailed=1

ohhhh le beau svg (ci-dessous tout moche en png)!


Démarrage automatique?... ok:
pi@dietpi:~ sudo nano /etc/init.d/xtwsdd

#! /bin/sh
### BEGIN INIT INFO
# Provides: xtwsd
# Required-Start: $network $remote_fs $syslog
# Required-Stop: $network $remote_fs $syslog
# Default-Start: 2 3 4 5
# Default-Stop: 0 1 6
# Short-Description: Serveur de marees
# Description: Serveur web json de marée basé sur xtide
### END INIT INFO

# Do NOT "set -e"

PATH=/sbin:/bin:/usr/sbin:/usr/bin:/usr/local/bin
DESC="Serveur de marees"
NAME=xtwsd
USERNAME=root
PIDFILE=/var/run/$NAME.pid
SCRIPTNAME=/etc/init.d/$NAME

DAEMON=/usr/local/bin/$NAME
DAEMON_ARGS="$DAEMON_ARGS 800"

# Exit if the package is not installed
[ -x "$DAEMON" ] || exit 0

# Load the VERBOSE setting and other rcS variables
. /lib/init/vars.sh

# Define LSB log_* functions.
# Depend on lsb-base (>= 3.2-14) to ensure that this file is present
# and status_of_proc is working.
. /lib/lsb/init-functions

pidof_xtwsd() {
# if there is actually a xtwsd process whose pid is in PIDFILE,
# print it and return 0.
if [ -e "$PIDFILE" ]; then
if pidof $NAME | tr ' ' '\n' | grep -w $(cat $PIDFILE); then
return 0
fi
fi
return 1
}

#
# Function that starts the daemon/service
#
do_start()
{
# Return
# 0 if daemon has been started
# 1 if daemon was already running
# 2 if daemon could not be started
start-stop-daemon --chuid $USERNAME --start --quiet --pidfile $PIDFILE --exec $DAEMON --test > /dev/null \
|| return 1
start-stop-daemon --start --quiet --pidfile $PIDFILE --exec $DAEMON -- \
$DAEMON_ARGS \
|| return 2
}

#
# Function that stops the daemon/service
#
do_stop()
{
# Return
# 0 if daemon has been stopped
# 1 if daemon was already stopped
# 2 if daemon could not be stopped
# other if a failure occurred
start-stop-daemon --stop --quiet --retry=TERM/30/KILL/5 --pidfile $PIDFILE --name $NAME
RETVAL="$?"
[ "$RETVAL" = 2 ] && return 2
# Wait for children to finish too if this is a daemon that forks
# and if the daemon is only ever run from this initscript.
# If the above conditions are not satisfied then add some other code
# that waits for the process to drop all resources that could be
# needed by services started subsequently. A last resort is to
# sleep for some time.
start-stop-daemon --stop --quiet --oknodo --retry=0/30/KILL/5 --exec $DAEMON
[ "$?" = 2 ] && return 2
# Many daemons don't delete their pidfiles when they exit.
rm -f $PIDFILE
return "$RETVAL"
}

case "$1" in
start)
[ "$VERBOSE" != no ] && log_daemon_msg "Starting $DESC" "$NAME"
do_start
case "$?" in
0|1) [ "$VERBOSE" != no ] && log_end_msg 0 ;;
2) [ "$VERBOSE" != no ] && log_end_msg 1 ;;
esac
;;
stop)
[ "$VERBOSE" != no ] && log_daemon_msg "Stopping $DESC" "$NAME"
do_stop
case "$?" in
0|1) [ "$VERBOSE" != no ] && log_end_msg 0 ;;
2) [ "$VERBOSE" != no ] && log_end_msg 1 ;;
esac
;;
status)
status_of_proc "$DAEMON" "$NAME" && exit 0 || exit $?
;;
reload)
log_daemon_msg "Reloading $DESC" "$NAME"
PID=$(pidof_xtwsd) || true
if [ "${PID}" ]; then
kill -HUP $PID
log_end_msg 0
else
log_end_msg 1
fi
;;
restart)
log_daemon_msg "Restarting $DESC" "$NAME"
do_stop
case "$?" in
0|1)
do_start
case "$?" in
0) log_end_msg 0 ;;
1) log_end_msg 1 ;; # Old process is still running
*) log_end_msg 1 ;; # Failed to start
esac
;;
*)
# Failed to stop
log_end_msg 1
;;
esac
;;
*)
echo "Usage: $SCRIPTNAME {start|stop|status|restart|reload}" >&2
exit 3
;;
esac

:

 ^o ^x


pi@dietpi:~ sudo chmod 755 /etc/init.d/xtwsdd
pi@dietpi:~ sudo update-rc.d xtwsdd defaults
pi@dietpi:~ sudo systemctl daemon-reload

Test #4
pi@dietpi:~ sudo /etc/init.d/xtwsdd start

Navigateur : http://192.168.1.3:800//graph/SHOM:1?local=1&detailed=1
On doit obtenir un graphe

 pi@dietpi:~ sudo reboot
..
..
Navigateur : http://192.168.1.3:800//graph/SHOM:1?local=1&detailed=1
Idem

Voilà !