mercredi 31 octobre 2018

Not a rpi trick but Asustor (as1004t v2) NAS sync with external USB drive


Synchronise NAS with an external USB hard disk or key

  1. Install entware to install rsync

  2. Log you on NAS ADM

    Install entware with "App Central"
    In config panel, enable ssh

  3. Use rsync

  4. Log you on NAS with a ssh terminal

Install screen

    $ opkg install screen

Start a screen

    $ screen -S toto

Display the list of files that will be sync

    $ rsync -a -v -n /share/USB1/ /share/Media/
    ...
    ... the list of file to sync
    ...

Synchronize files

    $ rsync -a -v -P /share/USB1/ /share/Media/

Detach screen

    Ctrl a + d
    $
    ...
    ....
    ...

Attach the screen to check the progress

    $ screen -x toto


Other interesting rsync options :

-u           ignorer certains fichiers plus récents dans le répertoire cible (update only)
--stats    afficher le rapport quand la sauvegarde est terminée

vendredi 31 août 2018


Raspberry become a RTL SDR server

Pre requesit

sudo apt-get update
sudo apt-get upgrade
sudo rpi-update


Plug your RTL SDR device

lsusb
You got something like that:

Bus 001 Device 002: ID 0424:9514 Standard Microsystems Corp.
Bus 001 Device 001: ID 1d6b:0002 Linux Foundation 2.0 root hub
Bus 001 Device 003: ID 0424:ec00 Standard Microsystems Corp.
Bus 001 Device 004: ID 0bda:2838 Realtek Semiconductor Corp. RTL2838 DVB-T
Bus 001 Device 005: ID 046d:c52b Logitech, Inc. Unifying Receiver

Manual Installation

The first step is to install a few packages that are required by the RTL-SDR server. You may already have some of these so don’t worry if you see a message that you already have the latest version.
To install these packages, type the following at the LXTerminal command line.
sudo apt-get install -y  git cmake pkg-config libusb-1.0-0-dev

Now you can download the RTL-SDR code from osmocom by typing the following at the command line:

git clone git://git.osmocom.org/rtl-sdr.git


The next step is to build RTL-SDR using the following commands. NB: Some of these may take a while so it’s probably time for a beer!

  1. cd rtl-sdr
  2. mkdir build
  3. cd build
  4. cmake ../ -DINSTALL_UDEV_RULES=ON
  5. make
  6. sudo make install
  7. sudo cp ../rtl-sdr.rules /etc/udev/rules.d/
  8. sudo ldconfig


Blacklist the DVB-T Drivers

The later versions of Raspbian include standard drivers so that the Dongles can operate in their original role as a USB Radio/TV device. Unfortunately, these drivers prevent access to the dongle by the rtl-sdr software. The solution is to create a dedicated blacklist file to prevent the unwanted drivers from loading.  Here’s the process:
List DVB drivers:
lsmod

Module Size Used by
dvb_usb_rtl2832u   15117  0
dvb_usb                   13368  1  dvb_usb_rtl2832u
dvb_core                  81677  2  dvb_usb

rc_core                     16948  14 ir_sharp_decoder,ir_xmp_decoder,lirc_dev,ir_lirc_codec,dvb_usb_rtl28xxu,ir_rc5_decoder,ir_nec_decoder,ir_sony_decoder,ir_mce_kbd_decoder,ir_jvc_decoder,dvb_usb_v2,ir_rc6_decoder,ir_sanyo_decoder
 
From the command line enter the following:
sudo nano /etc/modprobe.d/raspi-blacklist.conf
 
This creates a new file so enter the following lines:

blacklist dvb_usb_rtl2832u 
blacklist dvb_usb
blacklist dvb-core


Press control-X followed by Y to exit and save the modified file.
Now reboot the Pi:
sudo reboot

First tests

That completes the build and you can run a quick test by making sure your dongle is connected and typing: rtl_test -t
To start the server you need to access the Pi command line and type: 
rtl_tcp -a ‘your Pi’s IP address’
As a practical example, the start command for my setup is:
rtl_tcp -a 192.168.1.100


Start server at boot

sudo nano /etc/systemd/system/rtltcp.service

Then add this to the empty file (Make sure you are using the right IP address for your installation):

[Unit]
Description=RTLTCP
After=network.target
[Service]
ExecStartPre=/bin/sleep 30
ExecStart=/usr/local/bin/rtl_tcp -a 192.168.1.100
[Install]
WantedBy=multi-user.target

Hit Ctl +X then Y to save. Then:

sudo systemctl enable rtltcp.service

That makes it start at boot automatically

You now have an rtl_tcp server that can be accessed from anywhere. (If you open the appropriate router ports up).

dimanche 27 mai 2018

Forcer le wifi a rester actif (ou réveillé)


$ iwconfig


lo no wireless extensions.

enxb827eb80b379 no wireless extensions.

wlan0 IEEE 802.11 ESSID:"W4V3"
Mode:Managed Frequency:2.427 GHz Access Point: B0:4E:26:C5:F8:42
Bit Rate=65 Mb/s Tx-Power=31 dBm
Retry short limit:7 RTS thr:off Fragment thr:off
Power Management:on
Link Quality=37/70 Signal level=-73 dBm
Rx invalid nwid:0 Rx invalid crypt:0 Rx invalid frag:0
Tx excessive retries:4 Invalid misc:0 Missed beacon:0


$ sudo iwconfig wlan0 power off

$ iwconfig

lo no wireless extensions.

enxb827eb80b379 no wireless extensions.

wlan0 IEEE 802.11 ESSID:"W4V3"
Mode:Managed Frequency:2.427 GHz Access Point: B0:4E:26:C5:F8:42
Bit Rate=72.2 Mb/s Tx-Power=31 dBm
Retry short limit:7 RTS thr:off Fragment thr:off
Power Management:off
Link Quality=38/70 Signal level=-72 dBm
Rx invalid nwid:0 Rx invalid crypt:0 Rx invalid frag:0
Tx excessive retries:4 Invalid misc:0 Missed beacon:0


Modifier cette config à chaque démarrage:


Créer un script:
$ sudo nano /etc/network/if-up.d/powersaveoff


#!/bin/sh

# The connection is dropped when powersave if turned on.
# So we disable it.

# Disable the powersave
iw wlan0 set power_save off

Rendez ce script exécutable :
$ sudo chmod 755 /etc/network/if-up.d/powersaveoff

rebootez:
$ sudo reboot


ouala

mardi 6 février 2018

Accéder à un dossier partagé par Windows

Objet : Accéder en lecture et écriture à un dossier partagé par un poste sous Windows


Partager le dossier sous Windows en donnant un accès complet à "Tout le monde"

Plus d'infos ici :
https://www.howtogeek.com/176471/how-to-share-files-between-windows-and-linux/
Partager le dossier nommé "Samba" par exemple

Sur le Raspberry:

Installé le client Samba :

sudo apt-get install smbclient samba-common-bin cifs-utils

Créer le dossier local pour le point de montage 
sudo mkdir /media/jean

Tester l'accès distant

smbclient //192.168.1.28/Samba -m SMB2


Monter le dossier distant sur le dossier local
sudo mount -t cifs //192.168.1.28/Samba /media/jean -o vers=2.1,sec=ntlm,user=Jean


On accède au dossier partagé comme à tout autres dossiers du système, du moins presque...
Par exemple pour faire une sauvegarde de la carte SD

sudo dd if=/dev/mmcblk0 of=/media/jean/image.img bs=1M

Plus d'infos ici :https://rpiapps.blogspot.fr/2018/01/backup-de-limage-img-disque-systeme.html

dimanche 21 janvier 2018

Création d'une image (.img) de la carte SD du raspberry sur un serveur et réduction de la taille de l'image.

L'objet est de créer une sauvegarde de la carte SD vers un serveur distant sous samba et de réduire la taille de se fichier .img.

Prérequis

Un serveur sous linux avec samba ayant un espace libre supérieur à 3 fois la taille de la carte SD

Installation du client samba

sudo apt-get install samba-common smbclient samba-common-bin cifs-utils


Montage du dossier distant 

Le serveur samba est en 192.168.1.100 et partage un dossier nommé "NAS" pour l'utilisateur "nas" avec mot de passe "nas", "/media/nas" est le chemin local vers le serveur samba.

sudo mkdir /media/nas
sudo mount -t cifs //192.168.1.100/NAS /media/nas -o user=nas,pass=nas

Lancement de la copie de la carte SD

Option: utilisation d'un console déportée :
sudo apt-get install screen
sudo screen -S backup 


Le dossier partagé a pour chemin locale: /media/omv/tmp/

sudo dd if=/dev/mmcblk0 of=/media/omv/tmp/image.img bs=1M


Le temps passe et cours... et puis à la fin: 

On quitte la console déportée par Ctrl a + d et on y revient par sudo screen -x backup


15193+1 enregistrements lus
15193+1 enregistrements écrits
15931539456 bytes (16 GB, 15 GiB) copied, 5734,18 s, 2,8 MB/s


Maintenant on se connecte au serveur samba (192.168.1.100) pour réduire la taille de l'image créée

Création d'une console déportée 

sudo screen -S shrink

Lancement du script de réduction (voir plus bas)

sudo chmod +x pishrink.sh

sudo ./pishrink.sh /media/usb/tmp/image.img /media/usb/tmp/cabass.img

Ctrl a + d pour quitter la console déportée

Pour vérifier l'avancement du script on ré-ouvre la console déportée par:

sudo screen -x shrink
 

Ctrl a + d
etc...


A la fin le script donne les tailles des images avant et après, c'est beau.


Annexe

Voici le script pishrink.sh proposé par Matteo Mattei :

#!/bin/bash
#
# Copyright 2016 - Matteo Mattei <matteo.mattei@gmail.com>
# This script is intended to be used to shrink raspberry pi images
# created with dd client command.

# Check if you are root
if [ ! $(id -u) -eq 0 ]; then
   echo "ERROR: This program must run as root"
   exit 1
fi

IMG=${1}
# Check if the file exists
if [ ! -f ${IMG} ]; then
  echo "ERROR: File ${IMG} does not exist"
  exit 1
fi

if [ -z "$(which parted 2> /dev/null)" ]; then
   echo "ERROR: parted command not found - please install it and retry"
   exit 1
fi
if [ -z "$(which losetup 2> /dev/null)" ]; then
   echo "ERROR: losetup command not found - please install it and retry"
   exit 1
fi
if [ -z "$(which resize2fs 2> /dev/null)" ]; then
   echo "ERROR: resize2fs command not found - please install it and retry"
   exit 1
fi
if [ -z "$(which truncate 2> /dev/null)" ]; then
   echo "ERROR: truncate command not found - please install it and retry"
   exit 1
fi
if [ -z "$(which gzip 2> /dev/null)" ]; then
   echo "ERROR: gzip command not found - please install it and retry"
   exit 1
fi
INFO=$(parted -m ${IMG} unit B print | grep ext4)

NUM=$(echo ${INFO} | awk -F':' '{print $1}')
START=$(echo ${INFO} | awk -F':' '{print $2}')
OLD=$(echo ${INFO} | awk -F':' '{print $3}')
DUMMY=$(echo ${INFO} | awk -F':' '{print $4}')

START=${START::-1}
OLD=${OLD::-1}

LOOPBACK=$(losetup -f --show -o $START $IMG)
e2fsck -p -f ${LOOPBACK}
if [ ! ${?} -eq 0 ]; then
   echo "ERROR: filesystem seems corrupted"
   losetup -d ${LOOPBACK}
   exit 1
fi

INFO=$(resize2fs -P ${LOOPBACK} 2>&1)
SIZE=$(echo ${INFO} | awk -F': ' '{print $2}')
SIZE=$((${SIZE} + 1024))

resize2fs -p ${LOOPBACK} ${SIZE}

losetup -d ${LOOPBACK}
SIZE=$(( ${SIZE} * 4096 + ${START} ))

parted ${IMG} rm ${NUM}
parted -s ${IMG} unit B mkpart primary ${START} ${SIZE}

SIZE=$(( ${SIZE} + 58720257 ))
truncate -s ${SIZE} ${IMG}

gzip -9 ${IMG}
 

Merci à lui.


samedi 20 janvier 2018

Console déportée, ou faire quelque chose en tâche de fond

Screen permet d’exécuter des tâches dans une console déportée ou virtuelle ou masquée ou ce qu'on veut. ça permet d’exécuter des tâches longues en se déconnectant ou en continuant à travailler.

Installation:
sudo apt-get install screen

créer une console déportée:
screen -S toto

a partir de ce moment vous êtes dans la console déportée
      Lancez une tâche qui prend du temps, par exemple télécharger un film avec wget...
     wget http://www.toutgratos.com/unjolifilm.mkv

Sortez de la console:
 Appuyez sur les touches Ctrl et a puis sur d
   Ctrl a + d

Vous êtes revenu sur la console d'origine, vous pouvez continuer à travailler et même sortir par un beau exit

Pour lister les consoles déportées:
screen -ls

Pour re-rentrer dans la console déportée;
screen -x toto

vous revoila dans la console déportée, vous pouvez constater l'avancement de votre wget,
faites de nouveau Ctrl a + d pour en sortir etc...

lundi 1 janvier 2018

Premiers essais de domotique avec un Orange-Pi et un module recepteur 433.92 MHz

Update de l'orange pi

après avoir installer dietpi, un armbian léger en comparaison même de raspbian lite:
https://docs.google.com/spreadsheets/d/1mDHGZC-H6tU6_O8kuLTG8d4A8Nt7lV1Q7MXTR_6qw30/edit#gid=0
et après avoir également configuré la bestiole, on fait ...


 Comme d'hab..

sudo apt-get update
sudo apt-get upgrade


Python

cd ~ 
apt-get install python3-pip
apt-get install python3-dev
pip3 install rpi-rf

Brochage GPIO Raspberry Pi VS Orange Pi


WiringPI pour Orange Pi

cd ~ 
git clone https://github.com/zhaolei/WiringOP.git -b h3
cd WiringOP
chmod +x ./build
sudo ./build
 
 
Petit test:
gpio readall
gpio reset
gpio readall
 
 +-----+-----+----------+------+---+-Orange Pi+---+---+------+---------+-----+--+
 | BCM | wPi |   Name   | Mode | V | Physical | V | Mode | Name     | wPi | BCM |
 +-----+-----+----------+------+---+----++----+---+------+----------+-----+-----+
 |     |     |     3.3v |      |   |  1 || 2  |   |      | 5v       |     |     |
 |  12 |   8 |    SDA.0 |   IN | 1 |  3 || 4  |   |      | 5V       |     |     |
 |  11 |   9 |    SCL.0 |   IN | 1 |  5 || 6  |   |      | 0v       |     |     |
 |   6 |   7 |   GPIO.7 |   IN | 0 |  7 || 8  | 0 | IN   | TxD3     | 15  | 13  |
 |     |     |       0v |      |   |  9 || 10 | 0 | IN   | RxD3     | 16  | 14  |
 |   1 |   0 |     RxD2 |   IN | 0 | 11 || 12 | 0 | IN   | GPIO.1   | 1   | 110 |
 |   0 |   2 |     TxD2 |   IN | 1 | 13 || 14 |   |      | 0v       |     |     |
 |   3 |   3 |     CTS2 |   IN | 0 | 15 || 16 | 0 | IN   | GPIO.4   | 4   | 68  |
 |     |     |     3.3v |      |   | 17 || 18 | 0 | IN   | GPIO.5   | 5   | 71  |
 |  64 |  12 |     MOSI |   IN | 0 | 19 || 20 |   |      | 0v       |     |     |
 |  65 |  13 |     MISO |   IN | 0 | 21 || 22 | 0 | IN   | RTS2     | 6   | 2   |
 |  66 |  14 |     SCLK |   IN | 0 | 23 || 24 | 0 | IN   | CE0      | 10  | 67  |
 |     |     |       0v |      |   | 25 || 26 | 0 | IN   | GPIO.11  | 11  | 21  |
 |  19 |  30 |    SDA.1 |   IN | 1 | 27 || 28 | 1 | IN   | SCL.1    | 31  | 18  |
 |   7 |  21 |  GPIO.21 |   IN | 0 | 29 || 30 |   |      | 0v       |     |     |
 |   8 |  22 |  GPIO.22 |   IN | 0 | 31 || 32 | 0 | IN   | RTS1     | 26  | 200 |
 |   9 |  23 |  GPIO.23 |   IN | 0 | 33 || 34 |   |      | 0v       |     |     |
 |  10 |  24 |  GPIO.24 |   IN | 0 | 35 || 36 | 0 | IN   | CTS1     | 27  | 201 |
 |  20 |  25 |  GPIO.25 |   IN | 0 | 37 || 38 | 0 | IN   | TxD1     | 28  | 198 |
 |     |     |       0v |      |   | 39 || 40 | 0 | IN   | RxD1     | 29  | 199 |
 +-----+-----+----------+------+---+----++----+---+------+----------+-----+-----+
 | BCM | wPi |   Name   | Mode | V | Physical | V | Mode | Name     | wPi | BCM |
 +-----+-----+----------+------+---+-Orange Pi+---+------+----------+-----+-----+

433Utils

cd ~
git clone --recursive git://github.com/ninjablocks/433Utils.git
git submodule init
git submodule update 
cd 433Utils/RPi_utils

On modifie RFSniffer.cpp pour l'adapter au GPIO du orange pi comme suit:
Remplacer la ligne "int PIN = 2;" par "int PIN = 16;"


make

LE MODULE DE RECEPTION 433,92 MHz AUREL (ci-dessous) NE FONCTIONNE PAS BIEN !

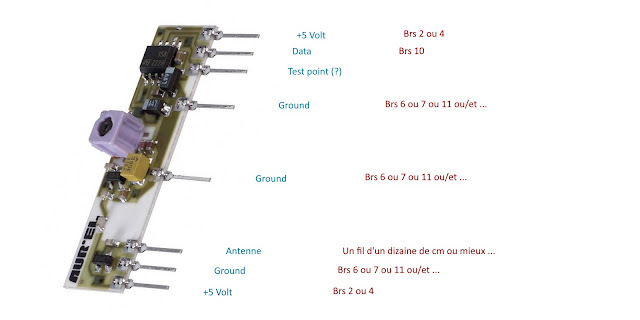
Ce récepteur manque de sensibilité


UTILISEZ UN MODULE RXB6 comme celui-là :


Ses qualités de réception sont bien meilleurs !


Essais cd ~/433Utils/RPi_utils
sudo ./RFSniffer


Attrapez votre télécommande et utilisez là, vous devriez voir queque chose comme ça :

~/433Utils/RPi_utils¤ sudo ./RFSniffer
Received 1361
Received 1361
Received 5471
Received 1361
Received 5471
Received 5471
Received 1361
Received 5457
Received 1361

Youppi! ...

Mais pourquoi les codes sont quelques fois différents pour une même touche ???
Il y a bien "appuyé" "relaché" mais "relaché" est parfois différent...

Réception de station météo Oregon Scientific

https://github.com/1000io/OregonPi