jeudi 21 décembre 2023

Orange Pi 5 + Serial port UART1

Place the file rockchip-rk3588-uart1-m1.dtbo in /boot/dtb/rockchip/overlay

~$sudo cp rockchip-rk3588-uart1-m1.dtbo /boot/dtb/rockchip/overlay

Edit armbianEnv.txt

~$sudo nano /boot/armbianEnv.txt

verbosity=1
bootlogo=false
overlay_prefix=rockchip-rk3588
overlays=uart1-m1

fdtfile=rockchip/rk3588s-orangepi-5.dtb

....

~$sudo reboot

~$ls /dev/ttyS*

/dev/ttyS1  /dev/ttyS9

~$screen /dev/ttyS1 1200

You should see teleinfo stream

(Ctrl A k y to exit from screen)


You can also add a link in /dev/serial/by-id to allow some software like domoticz to "view" the port:

~sudo ln -s /dev/ttyS1 /dev/serial/by-id/ttyS1_GPIO

mardi 19 décembre 2023

Orange Pi 5 + GPIO + Domoticz

I want to use GPIO's to manage relays with Domoticz and my Orange Pi 5:

Orange Pi 5 GPIO:


Below the outputs I want to manage:

Warning: wiringPi use wPi# but sysfs use GPIO#

That's the trick...


Go to domoticz home directory /home/domoticz or pi or dietpi etc.

- Create a script named sysfs.sh (or what ever) in domoticz directory

~$nano ~/domoticz/sysfs.sh

- Add this:

#! /bin/sh
#-----------------------------------------------------------------------------
# Init sysfs GPIO ports
#-----------------------------------------------------------------------------

#-----------------------------------------------------------------------------
# unexport if needed
#
#echo 6 > /sys/class/gpio/unexport
#echo 9 > /sys/class/gpio/unexport
#echo 10 > /sys/class/gpio/unexport
#echo 13 > /sys/class/gpio/unexport
#echo 15 > /sys/class/gpio/unexport
#echo 16 > /sys/class/gpio/unexport

#-----------------------------------------------------------------------------
# export
#
echo 29 > /sys/class/gpio/export
echo 59 > /sys/class/gpio/export
echo 58 > /sys/class/gpio/export
echo 35 > /sys/class/gpio/export
echo 52 > /sys/class/gpio/export
echo 92 > /sys/class/gpio/export


#-----------------------------------------------------------------------------
# Set direction = out
#
echo out > /sys/class/gpio/gpio29/direction
echo out > /sys/class/gpio/gpio59/direction
echo out > /sys/class/gpio/gpio58/direction
echo out > /sys/class/gpio/gpio35/direction
echo out > /sys/class/gpio/gpio52/direction
echo out > /sys/class/gpio/gpio92/direction

#-----------------------------------------------------------------------------
# Set active_low = 0 (false)
#
echo 0 > /sys/class/gpio/gpio29/active_low
echo 0 > /sys/class/gpio/gpio59/active_low
echo 0 > /sys/class/gpio/gpio58/active_low
echo 0 > /sys/class/gpio/gpio35/active_low
echo 0 > /sys/class/gpio/gpio52/active_low
echo 0 > /sys/class/gpio/gpio92/active_low

#-----------------------------------------------------------------------------
# Set edges = none if needed
#
# echo none > /sys/class/gpio/gpio4/edge
#-----------------------------------------------------------------------------

# Set pullups if needed
#
# raspi-gpio set 4 pu
# raspi-gpio set 11 dl
# raspi-gpio set 12 dl
#-----------------------------------------------------------------------------

- Save
- Make the file executable

chmod +x ~/domoticz/sysfs.sh

- Two options (many in fact)
1- Execute this script in the rc.local file:

~$sudo nano /etc/rc.local

- Add at the end of the script and before exit 0 this line

/home/domoticz/sysfs.sh
exit 0

2- Modify /etc/systemd/system/domoticz.service (better):

- Add the line : ExecStartPre=/home/domoticz/sysfs.sh before starting Domoticz

~$sudo nano /etc/systemd/system/domoticz.service

[Unit]
      Description=domoticz_service
      After=network-online.target
[Service]
#      User=dietpi
#      Group=dietpi
#      PermissionsStartOnly=true
      WorkingDirectory=/home/pi5/dev-domoticz
      PIDFILE=/var/run/domoticz/domoticz.pid
#Kill rtl_433 (domoticz cant start if it's already started)
      ExecStartPre=-/usr/bin/killall -q rtl_433
#      ExecStartPre=/usr/bin/install -d -m 0700 -o pi5 -g PI5 /var/run/domoticz
      ExecStartPre=setcap 'cap_net_bind_service=+ep' /home/pi5/dev-domoticz/domoticz
#GPIO
      ExecStartPre=/home/domoticz/sysfs.sh
      
#Start domoticz
      ExecStart=/home/pi5/dev-domoticz/domoticz -www 80 -sslwww 0 -pidfile /var/run/domoticz/domoticz.pid
      Restart=on-failure
      RestartSec=1m
      #StandardOutput=null
[Install]
      WantedBy=multi-user.target


- Reboot

- Verify GPIO exports
~$sudo gpio exports

You should receive something like that:


GPIO Pins exported:
   0(29): out  1  none
   0(35): out  1  none
   0(52): out  1  none
   0(58): out  1  none
   0(59): out  1  none


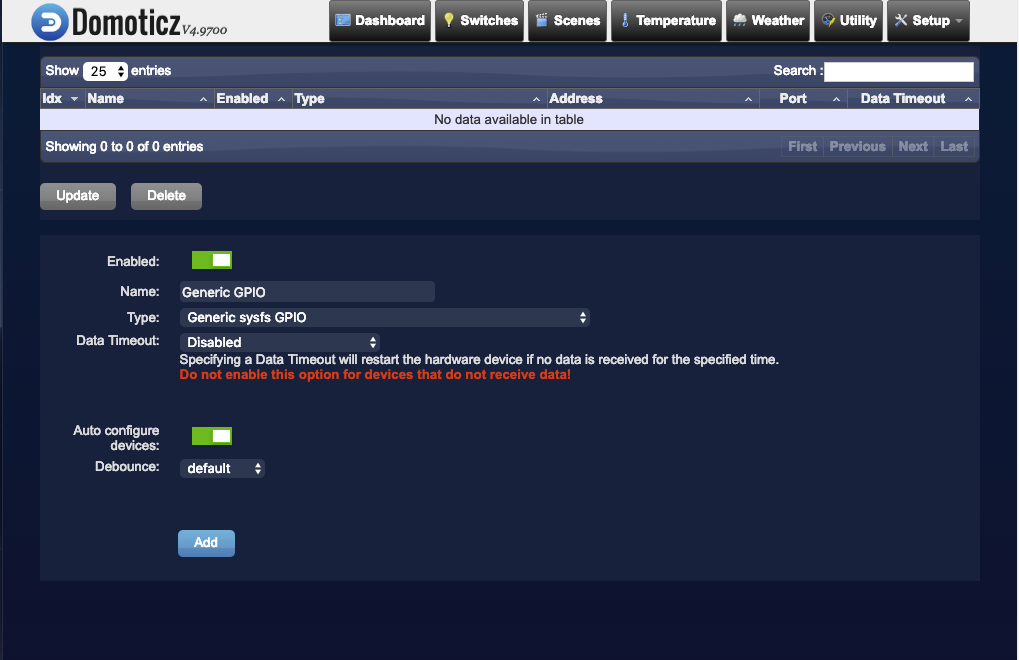
In Domoticz -> 
    Setup -> 
        Hardware -> 
            Add New hardware of the type ‘Generic sysfs GPIO’.


        Then add new devices from unused in "Generic GPIO" (the name you give to your new hardware)

Don't forget to add those devices to your user !


lundi 27 novembre 2023

Orange PI 5 + Domoticz + rtl_433

Compile dev_domoticz from sources :

https://www.domoticz.com/wiki/Build_Domoticz_from_source


Install rtl_433 :

sudo apt-get install rtl-433

sudo rtl_433


Using systemd service:


sudo nano /etc/systemd/system/domoticz.service


[Unit]

      Description=domoticz_service

      After=network-online.target

[Service]

#      User=dietpi

#      Group=dietpi

#      PermissionsStartOnly=true

      WorkingDirectory=/home/pi5/dev-domoticz

      PIDFILE=/var/run/domoticz/domoticz.pid

      ExecStartPre=-/usr/bin/killall -q rtl_433

#      ExecStartPre=/usr/bin/install -d -m 0700 -o pi5 -g PI5 /var/run/domoticz

      ExecStartPre=setcap 'cap_net_bind_service=+ep' /home/pi5/dev-domoticz/domoticz

      ExecStart=/home/pi5/dev-domoticz/domoticz -www 80 -sslwww 443 -pidfile /var/run/domoticz/domoticz.pid

      Restart=on-failure

      RestartSec=1m

      #StandardOutput=null

[Install]

      WantedBy=multi-user.target


sudo systemctl enable domoticz

sudo systemctl daemon-reload

sudo systemctl restart domoticz

sudo service domoticz status


● domoticz.service - domoticz_service

     Loaded: loaded (/etc/systemd/system/domoticz.service; enabled; vendor preset: enabled)

     Active: active (running) since Mon 2023-11-27 09:49:56 CET; 3h 26min ago

    Process: 64410 ExecStartPre=/usr/bin/killall -q rtl_433 (code=exited, status=1/FAILURE)

    Process: 64411 ExecStartPre=setcap cap_net_bind_service=+ep /home/pi5/dev-domoticz/domoticz (code=exited, status=0/SUC>

   Main PID: 64412 (domoticz)

      Tasks: 27 (limit: 4149)

     Memory: 27.4M

        CPU: 25min 18.524s

     CGroup: /system.slice/domoticz.service

             ├─64412 /home/pi5/dev-domoticz/domoticz -www 80 -sslwww 443 -pidfile /var/run/domoticz/domoticz.pid

             ├─64440 sh -c "rtl_433 -F json -M newmodel -C si -M level  2>/dev/null"

             └─64441 rtl_433 -F json -M newmodel -C si -M level


Orange PI 5 + GPIO

sudo apt-get update
sudo apt-get install -y git
git clone https://github.com/orangepi-xunlong/wiringOP.git
cd wiringOP
sudo ./build clean
sudo ./build 

If you got something like :

Oops: Unable to determine board revision from /etc/orangepi-release or /etc/armbian-release.

 -> Unable to open /etc/orangepi-release or /etc/armbian-release.

 ->  You'd best google the error to find out why.


echo "BOARD=orangepi5" | sudo tee /etc/orangepi-release

gpio readall
 +------+-----+----------+--------+---+   OPI5   +---+--------+----------+-----+------+
 | GPIO | wPi |   Name   |  Mode  | V | Physical | V |  Mode  | Name     | wPi | GPIO |
 +------+-----+----------+--------+---+----++----+---+--------+----------+-----+------+
 |      |     |     3.3V |        |   |  1 || 2  |   |        | 5V       |     |      |
 |   47 |   0 |    SDA.5 |     IN | 1 |  3 || 4  |   |        | 5V       |     |      |
 |   46 |   1 |    SCL.5 |     IN | 1 |  5 || 6  |   |        | GND      |     |      |
 |   54 |   2 |    PWM15 |     IN | 1 |  7 || 8  | 0 | IN     | RXD.0    | 3   | 131  |
 |      |     |      GND |        |   |  9 || 10 | 0 | IN     | TXD.0    | 4   | 132  |
 |  138 |   5 |  CAN1_RX |     IN | 1 | 11 || 12 | 1 | IN     | CAN2_TX  | 6   | 29   |
 |  139 |   7 |  CAN1_TX |     IN | 1 | 13 || 14 |   |        | GND      |     |      |
 |   28 |   8 |  CAN2_RX |     IN | 1 | 15 || 16 | 1 | IN     | SDA.1    | 9   | 59   |
 |      |     |     3.3V |        |   | 17 || 18 | 1 | IN     | SCL.1    | 10  | 58   |
 |   49 |  11 | SPI4_TXD |     IN | 1 | 19 || 20 |   |        | GND      |     |      |
 |   48 |  12 | SPI4_RXD |     IN | 1 | 21 || 22 | 1 | IN     | GPIO2_D4 | 13  | 92   |
 |   50 |  14 | SPI4_CLK |     IN | 1 | 23 || 24 | 1 | IN     | SPI4_CS1 | 15  | 52   |
 |      |     |      GND |        |   | 25 || 26 | 1 | IN     | PWM1     | 16  | 35   |
 +------+-----+----------+--------+---+----++----+---+--------+----------+-----+------+
 | GPIO | wPi |   Name   |  Mode  | V | Physical | V |  Mode  | Name     | wPi | GPIO |
 +------+-----+----------+--------+---+   OPI5   +---+--------+----------+-----+------+


vendredi 9 juin 2023

Orange Pi 5 - Transfert System and boot ... EASY

From this thread : https://forum.armbian.com/topic/27048-not-booting-to-system-on-nvme/

Thanx to robnielsen


Deleted partition on NVMe (if needed)

gdisk /dev/nvme0n1


d

1

d


Copied SD card to NVMD

cat /dev/mmcblk1 > /dev/nvme0n1


Could take some time 


Powered off the Orange Pi 5, removed the SD card and then powered it back on and it booted from the NVMe. 


Then resized the filesystem

 /usr/lib/armbian/armbian-resize-filesystem start


Now I have some thing like:

$ df -H
Filesystem      Size  Used Avail Use% Mounted on
udev            8.3G     0  8.3G   0% /dev
tmpfs           1.7G   10M  1.7G   1% /run
/dev/nvme0n1p2  254G  5.7G  245G   3% /
tmpfs           8.3G     0  8.3G   0% /dev/shm
tmpfs           5.3M  4.1k  5.3M   1% /run/lock
tmpfs           8.3G     0  8.3G   0% /tmp
/dev/nvme0n1p1  269M  158M  111M  59% /boot
/dev/zram1       51M  4.8M   43M  11% /var/log
tmpfs           1.7G     0  1.7G   0% /run/user/1000

$ mount | grep /dev/n
/dev/nvme0n1p2 on / type ext4 (rw,noatime,errors=remount-ro,commit=600)
/dev/nvme0n1p1 on /boot type vfat (rw,relatime,fmask=0022,dmask=0022,codepage=936,iocharset=utf8,shortname=mixed,errors=remount-ro)
/dev/nvme0n1p2 on /var/log.hdd type ext4 (rw,noatime,errors=remount-ro,commit=600)


lundi 22 mai 2023

OrangePi 3 LTS + USB DAC + MPD (from sources) + Resampling and Equalizer

 I've buy this DAC :

A CMEDIA CM6631A

HIFI CM6631A DAC Board USB Digital interface 32 / 24Bit 192k USB To I2S/SPDIF Coaxial Output Audio Decoder Analog Converter


Note : This DAC is a little noisy when using sampling frequencies above 48000 Hz, ultimately I do not recommend it. 😒


Compiling MPD from git (version 0.24) optional and not verified ! 

~#nano buildmpd.sh

#ALL AS ROOT
sudo su
cd ~

#Stop current MPD then remove
mpd --kill
service mpd stop
apt remove mpd

#CLONE / DOWNLOAD SOURCES
git clone https://github.com/MusicPlayerDaemon/MPD.git

#DEPENDENCIES
apt install meson g++ \
  python3-sphinx \
  libfmt-dev \
  libpcre2-dev \
  libmad0-dev libmpg123-dev libid3tag0-dev \
  libflac-dev libvorbis-dev libopus-dev libogg-dev \
  libadplug-dev libaudiofile-dev libsndfile1-dev libfaad-dev \
  libfluidsynth-dev libgme-dev libmikmod-dev libmodplug-dev \
  libmpcdec-dev libwavpack-dev libwildmidi-dev \
  libsidplay2-dev libsidutils-dev libresid-builder-dev \
  libavcodec-dev libavformat-dev \
  libmp3lame-dev libtwolame-dev libshine-dev \
  libsamplerate0-dev libsoxr-dev \
  libbz2-dev libcdio-paranoia-dev libiso9660-dev libmms-dev \
  libzzip-dev \
  libcurl4-gnutls-dev libyajl-dev libexpat-dev \
  libasound2-dev libao-dev libjack-jackd2-dev libopenal-dev \
  libpulse-dev libshout3-dev \
  libsndio-dev \
  libmpdclient-dev \
  libnfs-dev \
  libupnp-dev \
  libavahi-client-dev \
  libsqlite3-dev \
  libsystemd-dev \
  libgtest-dev \
  libicu-dev \
  libchromaprint-dev \
  libgcrypt20-dev libavformat-dev libavfilter-dev libavdevice-dev ffmpeg

#Change to SOURCES folder
cd MPD

#CONFIGURE
# Add "--reconfigure \" if options have changed
meson . output/release \
 --prefix=/usr \
 --sysconfdir=/etc \
 --mandir=/usr/share/man \
 --localstatedir=/var \
 --buildtype=release \
 -Dao=disabled \
 -Daudiofile=disabled \
 -Dbzip2=enabled \
 -Dcdio_paranoia=disabled \
 -Dchromaprint=disabled \
 -Dcue=true \
 -Dcurl=auto \
 -Ddaemon=true \
 -Ddatabase=true \
 -Ddbus=enabled \
 -Ddocumentation=enabled \
 -Ddoxygen=false \
 -Ddsd=true \
 -Depoll=true \
 -Deventfd=true \
 -Dexpat=enabled \
 -Dfaad=auto \
 -Dffmpeg=enabled \
 -Dfifo=true \
 -Dflac=auto \
 -Dfluidsynth=disabled \
 -Dfuzzer=false \
 -Dgme=disabled \
 -Dhtml_manual=false \
 -Dhttpd=false \
 -Diconv=enabled \
 -Dicu=enabled \
 -Did3tag=auto \
 -Dinotify=true \
 -Dio_uring=auto \
 -Dipv6=enabled \
 -Diso9660=auto \
 -Djack=enabled \
 -Dlame=enabled \
 -Dlibfuzzer=true \
 -Dlibmpdclient=auto \
 -Dlibsamplerate=enabled \
 -Dlocal_socket=true \
 -Dmad=disabled \
 -Dmanpages=true \
 -Dmikmod=disabled \
 -Dmms=disabled \
 -Dmodplug=disabled \
 -Dmpcdec=auto \
 -Dmpg123=auto \
 -Dneighbor=false \
 -Dnfs=auto \
 -Dopenal=enabled \
 -Dopenmpt=auto \
 -Dopus=enabled \
 -Doss=disabled \
 -Dpcre=enabled \
 -Dpipe=true \
 -Dpipewire=auto \
 -Dpulse=enabled \
 -Dqobuz=disabled \
 -Drecorder=false \
 -Dshine=enabled \
 -Dshout=enabled \
 -Dsidplay=auto \
 -Dsignalfd=true \
 -Dsmbclient=auto \
 -Dsnapcast=true \
 -Dsndfile=disabled \
 -Dsndio=enabled \
 -Dsolaris_output=enabled \
 -Dsoundcloud=disabled \
 -Dsoxr=enabled \
 -Dsqlite=enabled \
 -Dsyslog=enabled \
 -Dsystemd=auto \
 -Dsystemd_system_unit_dir= \
 -Dsystemd_user_unit_dir= \
 -Dtcp=true \
 -Dtest=false \
 -Dtremor=auto \
 -Dtwolame=auto \
 -Dudisks=enabled \
 -Dupnp=auto \
 -Dvorbis=auto \
 -Dvorbisenc=auto \
 -Dwave_encoder=false \
 -Dwavpack=enabled \
 -Dwebdav=disabled \
 -Dwildmidi=disabled \
 -Dyajl=disabled \
 -Dzeroconf=avahi \
 -Dzlib=enabled \
 -Dzzip=auto

#BUILD
ninja -C output/release

#INSTALL
ninja -C output/release install


Save and change flags:
~#chmod 755 buildmpd.sh

Launch the script:
~#./buildmpd

... normaly, everything well done, you've got a good MPD including libavfilter (futur use...)

DAC Detection

~# lsusb -t
/:  Bus 07.Port 1: Dev 1, Class=root_hub, Driver=musb-hdrc/1p, 480M
/:  Bus 06.Port 1: Dev 1, Class=root_hub, Driver=ohci-platform/1p, 12M
/:  Bus 05.Port 1: Dev 1, Class=root_hub, Driver=ohci-platform/1p, 12M
    |__ Port 1: Dev 2, If 0, Class=Human Interface Device, Driver=usbhid, 1.5M
    |__ Port 1: Dev 2, If 1, Class=Human Interface Device, Driver=usbhid, 1.5M
/:  Bus 04.Port 1: Dev 1, Class=root_hub, Driver=ehci-platform/1p, 480M
    |__ Port 1: Dev 2, If 0, Class=Audio, Driver=snd-usb-audio, 480M
    |__ Port 1: Dev 2, If 1, Class=Audio, Driver=snd-usb-audio, 480M
    |__ Port 1: Dev 2, If 2, Class=Human Interface Device, Driver=usbhid, 480M
/:  Bus 03.Port 1: Dev 1, Class=root_hub, Driver=ehci-platform/1p, 480M
/:  Bus 02.Port 1: Dev 1, Class=root_hub, Driver=xhci-hcd/1p, 5000M
/:  Bus 01.Port 1: Dev 1, Class=root_hub, Driver=xhci-hcd/1p, 480M

DAC has been detected 👌

List Alsa devices

~#aplay -l
**** List of PLAYBACK Hardware Devices ****
card 0: allwinnerac200c [allwinner,ac200-codec], device 0: 508f000.i2s-acx00-dai acx00-codec-0 [508f000.i2s-acx00-dai acx00-codec-0]
  Subdevices: 1/1
  Subdevice #0: subdevice #0
card 1: Audio [USB2.0 High-Speed True HD Audio], device 0: USB Audio [USB Audio]
  Subdevices: 1/1
  Subdevice #0: subdevice #0
card 2: sun9ihdmi [sun9i-hdmi], device 0: SUN9I-HDMI PCM i2s-hifi-0 [SUN9I-HDMI PCM i2s-hifi-0]
  Subdevices: 1/1
  Subdevice #0: subdevice #0

DAC is listed has Alsa device 👌

An other way to list sound cards

~# cat /proc/asound/cards
 0 [allwinnerac200c]: simple-card - allwinner,ac200-codec
                      allwinner,ac200-codec
 1 [Audio          ]: USB-Audio - USB2.0 High-Speed True HD Audio
                      C-Media Electronics Inc. USB2.0 High-Speed True HD Audio at usb-5311000.usb-1,
 2 [sun9ihdmi      ]: sun9i-hdmi - sun9i-hdmi
                      sun9i-hdmi

Play some sound

card 1: Audio [USB2.0 High-Speed True HD Audio], device 0: USB Audio [USB Audio]
  Subdevices: 1/1
  Subdevice #0: subdevice #0

Mean that your DAC is linked to :
  • "card 1" mean hw 1
  • "Subdevices: 1/1" mean only one device
  • "Subdevice #0: subdevice #0" mean that this only device is the device 0

Trying the DAC

~#aplay -D hw:1,0 test.wav

If you have well-connected the DAC to an amplifier, you should hear the test.wav sound file.

Trying all devices ...

  1. On board sound chip [allwinner,ac200-codec] :
    • ~#aplay -D hw:0,0 test.wav
    • Or by using the name:
    • ~#aplay -D CARD=allwinnerac200c,DEV=0 test.wav
  2. The DAC [USB2.0 High-Speed True HD Audio]
    • ~#aplay -D hw:1,0 test.wav
    • Or by using the name:
    • ~#aplay -D CARD=Audio,DEV=0 test.wav
  3. HDMI screen speakers [sun9i-hdmi]
    • ~#aplay -D hw:2,0 test.wav
    • Or by using the name:
    • ~#aplay -D CARD=sun9ihdmi,DEV=0 test.wav


Adding alsa equalizer in conf files 

Setting up asound.conf

~#nano /etc/asound.conf
pcm.!default {
type asym
playback.pcm {
type plug
slave.pcm "usbdac"
}
capture.pcm {
type plug
slave.pcm "hw:allwinnerac200c,0"
}
}

ctl.!default {
type hw
card Audio
device 0
}

ctl.equal {
type equal
}

pcm.equaldac {
type equal
slave.pcm "plughw:Audio,0"
}

pcm.daqual {
type plug
slave.pcm equaldac
}

pcm.usbdac {
type softvol
slave.pcm "plughw:Audio,0"
control.name "Master"
control.card 0
}

Setting up audio output section in mpd.conf

#################################
######### AUDIO OUTPUTS #########
#################################

# Use resampling for smoother sound but heavy CPU load
resampler {
plugin "libsamplerate"
type "1"
}

# First prefered output
audio_output {
name "DAC Equ Resamp"
type "alsa"
device "plug:daqual"
format "176400:32:2"
auto_resample         "no"
auto_format "yes"
enabled "yes"
mixer_type "software"
}

#
# Equalized DAC, no resamp
audio_output {
type "alsa"
name "DAC Equalized"
device "plug:daqual"
enabled "yes"
mixer_type "software"
}

# Only resampled no equalizer DAC (forced format)
audio_output {
type "alsa"
name "DAC"
device "hw:CARD=Audio,DEV=0"
format                  "176400:32:2"
auto_resample         "no"
auto_format "no"
enabled "yes"
mixer_type "software"
}

# HDMI output for test
audio_output {
type "alsa"
name "HDMI"
device "hw:CARD=sun9ihdmi,DEV=0"
mixer_type "software"
}


mercredi 10 mai 2023

Howto delete file or folder with dot at the end of the name ...

Open command prompt and use rd :

 rd /s "\\?\C:\Documents and Settings\User\Desktop\Annoying Folder..."

jeudi 13 avril 2023

433 Mhz switch command with GPIO with Raspberry Pi 3

Original thread :


Hardware :

Install g++ and Git :

sudo apt-get update
sudo apt-get upgrade
sudo apt-get install gcc g++ make git

Install and compile 433Utils :

git clone --recursive https://github.com/ninjablocks/433Utils.git 
cd 433Utils/RPi_utils 
make all

sudo ./RFSniffer

... Then press the corresponding buttons on the remote control. The code received is then displayed (for me, it is 5510417 for on and 5510420 for off). 
After reading the code, you can also remove the 433Mhz receiver if you mind.

sudo nano control.cpp

Put in it :

#include "../rc-switch/RCSwitch.h"
#include <stdlib.h>
#include <stdio.h>

int main(int argc, char *argv[]) {
int PIN = 0; // cf. wiring Pi pinout
int codeSocketDon = 5510417;
int codeSocketDoff = 5510420;

if (wiringPiSetup() == -1) return 1;

RCSwitch mySwitch = RCSwitch();
mySwitch.enableTransmit(PIN);

if (atoi(argv[1]) == 1) { // you can set your own conditions here
    mySwitch.send(codeSocketDon, 24);
} else {
    mySwitch.send(codeSocketDoff, 24);
}
return 0;
}

Then compile :

g++ -DRPI ../rc-switch/RCSwitch.cpp control.cpp -o control -lwiringPi

Turn ON :

sudo ./control 1

Turn OFF :

sudo ./control 0